Header

Construction Process
aps
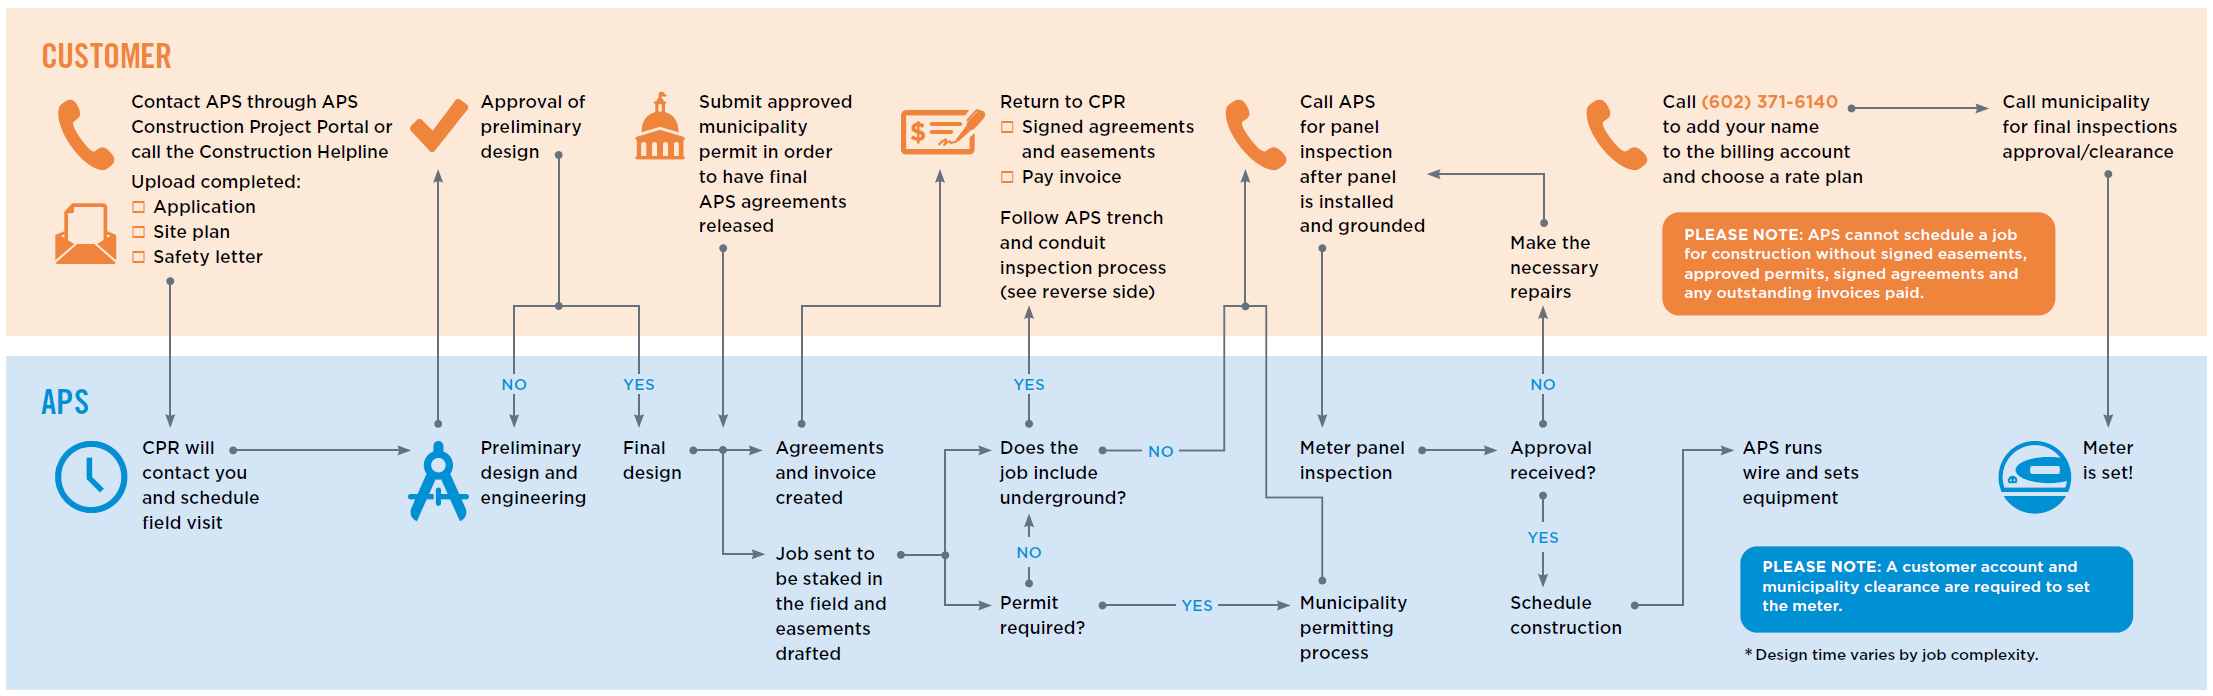
Typical Construction Project Workflow
View our workflows for construction and underground trench and conduit processes. Project timelines may vary by job complexity and current turnaround times.
Getting Started
Step 1: Review Conflicts
Conflict reviews help you avoid disputes and disagreements throughout the construction process. Click on the APS Construction Project Portal, and then submit a conflict review request.
Step 2: Initiate Power
Now it's time to get your power up and running. Fill out our project application on the APS Construction Project Portal. Be sure to include your project plans, deeds, permits and any other necessary documents when you apply.
Step 3: Create a Game Plan
Your Customer Project Representative will serve as your project’s point of contact. Together, you will discuss the design, timeline and cost of your project. Your representative will answer any questions you have about the above construction process. You will be assigned a Customer Project Representative after you submit a project application.
Step 4: Learn About Electric Service Requirements
Before you break ground, get familiar with our electric service requirements. These guidelines will provide you with the knowledge and resources you need to complete your project with minimal issues. Now is also a good time to inquire about outdoor lighting and solar services.

Installing Electric Service
Step 1: If you’re installing power at a residence with 400 Amps or less, choose an electrical meter panel/service entrance section from our residential preapproved panel list. If your panel is CT rated and 200 Amps or less, select one from this CT rated preapproved list. For commercial panels up to 200 Amps, choose one from this commercial preapproved panel list. If your panel is outside of the above boundaries, you must submit your panel spec sheet information to your Customer Project Representative or send an email to the contact you’ll find when your enter your project’s location on the customer construction portal.
Step 2: Review each section of our Electrical Service Requirements Manual to ensure you meet all specifications for metering, overhead, underground and trenching.
Step 3: Contact Arizona 811 at least three days before starting any excavation work, and review Arizona Blue Stake Laws to ensure a safe digging process.
Step 4: Before we can connect power to your electrical panel, you must first schedule a site inspection with your local municipality. Your Customer Project Representative can help you schedule an inspection of the trench, conduit and utility side of the electrical panel only. For additional inspection needs, view your city’s municipality clearance requirements.
Step 5: Review charges for extending your power. Schedule 1 outlines the terms and conditions for standard offer and direct-access services. Schedule 3 outlines conditions governing extensions of electric distribution lines and services.
More Construction Services


